|
|

|
| | | | | | |  | |  |  | |  | | Wrangler Buildup - Slip Yoke Eliminator and CV Driveshaft : 2003-01-23 | | |
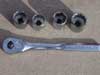
The next step in the conversion of “Big Brick” had to be the slip yoke eliminator (SYE)* and new driveshaft. Rob picked up the SYE from Gloeco with the promise and payment for a driveshaft to be created after we measured the new distance from diff to yoke. Rob and I proceeded to remove the old driveshaft, and drain plug. Well, not really. Four trips to the store and one internet search later we bought 3 sockets that didn’t work and a 30mm that did (see picture 4). So, three hours later, the drain plugs out and we decide to try the conversion while the case is still on the Jeep. I swear the collective IQ of guys working on cars is halved when in a group.
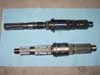
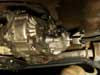
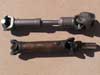
With the case off it looks kind of scary in there (pictures 5-6). But a quick pull should get the shafts out. That is if you take the front yoke off while you still have the case together. Ugh, after putting the case back on, taking the yoke and case back off again we are pulling the main shaft and front drive shaft (sorry, don’t know the real name) out. As you can see (picture 7) the new shaft (bottom) is shorter and stockier.
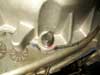
At this point we stopped and called it a night after trying to put the gears on the new shaft and they didn’t fit. It turns out that even though the instructions say you should leave the needle bearings in, they have to come out for the gears to fit on the new shaft. On a side note, this was my first experience with snap rings. They do a great service but they suck to remove or put back on. Back in went the shafts, shift fork and chain. On goes the housing with a sealer (make sure to seal all the way around the bolts to prevent leaks like picture 12) with the oil pump installed correctly and magnet under the filter. Oh, and that darn magnet tends to fall out and attach it’s self to the nearest metal object making it a bear to find if you move that metal object into the garage without checking it first. Lastly we bolted on the front and new rear yoke.
After careful measuring (yeah right, this is AMS, we took a rough measurement and figured a quarter inch either way wouldn’t hurt) we ordered the driveshaft and waited till it was ready. As I didn’t have anything better to do, I started painting over the rust on the bottom of the Jeep. I figure it’s better to tackle it now. The red skid plate was Rob’s idea, but it’s growing on me. After what felt like days, 2 in fact, I had the new shaft in my hands. It’s a beast (picture 18) with a nice CV joint to handle the increased angles. It didn’t take long to put it on and take it out for a spin. Now I couldn’t be hard on it as my rear perches are only tacked on, no track bars and diff angle isn’t quite right but it was nice to take it around the block and to Rob’s.
Thanks for playing, drive thru.
While you’re here, check out the sweet welding job on the muffler in the last picture. A last minute fix before the last trip to the Cinders.
* Jeeps as delivered have what is referred to as a slip yoke that connects the transfer case to the rear driveshaft. When flexing the axle moves away from the non-moving transfer case. The slip yoke allows the drive driveshaft to slide along splines on the transfer case main shaft. The two problems with this are 1) it adds about 3-4 inches to the transfer case making the driveshaft angle outrageous if you lift vehicle and 2) if something breaks in the rear axle you can’t take the driveshaft out without losing all of your precious transfer case fluid. The SYE replaces the transfer case main shaft with a shorter version that a yoke attaches directly to alleviating both of the above problems. BUT you must replace the driveshaft that allows for compression and extension.
| |  | |  |
|